Do you know that 82% of people won’t visit a site is labeled as not secure? That means if you don’t have an active SSL on your website, you’re going to loose almost all of your visitors! Yikes!
Let’s fix that today in less than 3 minutes!
Disclaimer: Some of the links in this post are affiliate links. This means if you click on the link and purchase the item, I will receive an affiliate commission at no extra cost to you. All opinions remain my own.
What is an SSL?
Now before we get started, let’s talk for a brief minute about what an SSL is and why you should care. An SSL is basically an encryption. It’s like creating a code that information travels between the people who come to see your site and the server where your website lives.
Now you rent space on a server through your hosting company, in this case Siteground, and your website lives there. And when people come to your site, their computers create a link to that server. We want that link to be as secure as possible. So what an SSL does is it creates a code so that people can’t intercept the data that’s going back and forth.
Do All Websites Need an SSL?
SSLs used to be required only for ecommerce sites where people would be taking credit card information because we really don’t want our credit card information stolen, right? Now it really is required of everybody, whether you’re just collecting email addresses or if you are collecting data from pixels.
SSLs are really a requirement from Google now of all websites and that’s why when you visit some sites, you’ll get a warning that their site isn’t secure. It means that they don’t have an SSL or it isn’t up to date.
How to Install A SSL in 3 Minutes
Step 1: Open Up Your CPanel

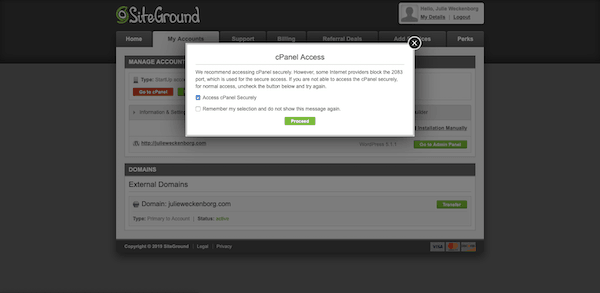
The first thing that you’ll need to do is log in to your Siteground hosting account. Now, if you don’t have a Siteground hosting account, you should really get one. Siteground is amazing for their customer experience. You’re going to go to the My Account tab and then go down to CPanel. Click proceed, and this is going to open up your c panel.
Now, Siteground and most other hosting companies out there provide free SSLs with their hosting packages through Let’s Encrypt. Let’s Encrypt is a nonprofit organization that is supported by all the major tech players out there that provide SSLs for free to people like us who really don’t need to pay for a high tech one because we don’t have an ecommerce site.
Step 2: Request an SSL from Let’s Encrypt
In the little search panel, type in let’s and it will pull up the Let’s Encrypt. Click on that icon. The first thing you’re going to have to do is choose the domain that’s associated with your account and then click the Let’s Encrypt SSL and install. They’ll let you know that it’s been added to the queue to install. We’re going to go back home. It can take a couple minutes for it to go through.
Step 3: Force the HTTPS

Now after it’s reloaded, when it’s ready to go, it’ll tell you that by saying active.
The last thing you want to do under action is go to https settings and force your website to load through an https. That means that you’re going to make sure that everything that goes through to your website is going through that secured link. Click okay, and you’re done.
It’s really that easy, and that’s it. Your SSL is active and ready to install. Now, SSLs need to be reactivated every 90 days, but thankfully Siteground takes care of that for you. So once you’ve installed this, you’re good to go for as long as you are with Siteground. If you have any questions, pop them in the comments below and I’ll be happy to help you out.


